A hygienist walks to the front desk: "The sensor isn't working in operatory 2." The patient is in the chair with a bite tab in their mouth. The schedule has three more patients waiting. And the imaging system — the one piece of equipment the clinical team depends on multiple times per hour — just went dark.
Dental imaging failures are one of the most disruptive IT issues a practice can face. Unlike a software crash where you can switch to paper charting temporarily, you can't take an X-ray without a working sensor and imaging software. The clinical workflow stops cold. We see imaging-related support tickets account for roughly 15% of all dental IT issues across the practices we monitor — and they're consistently the most urgent.
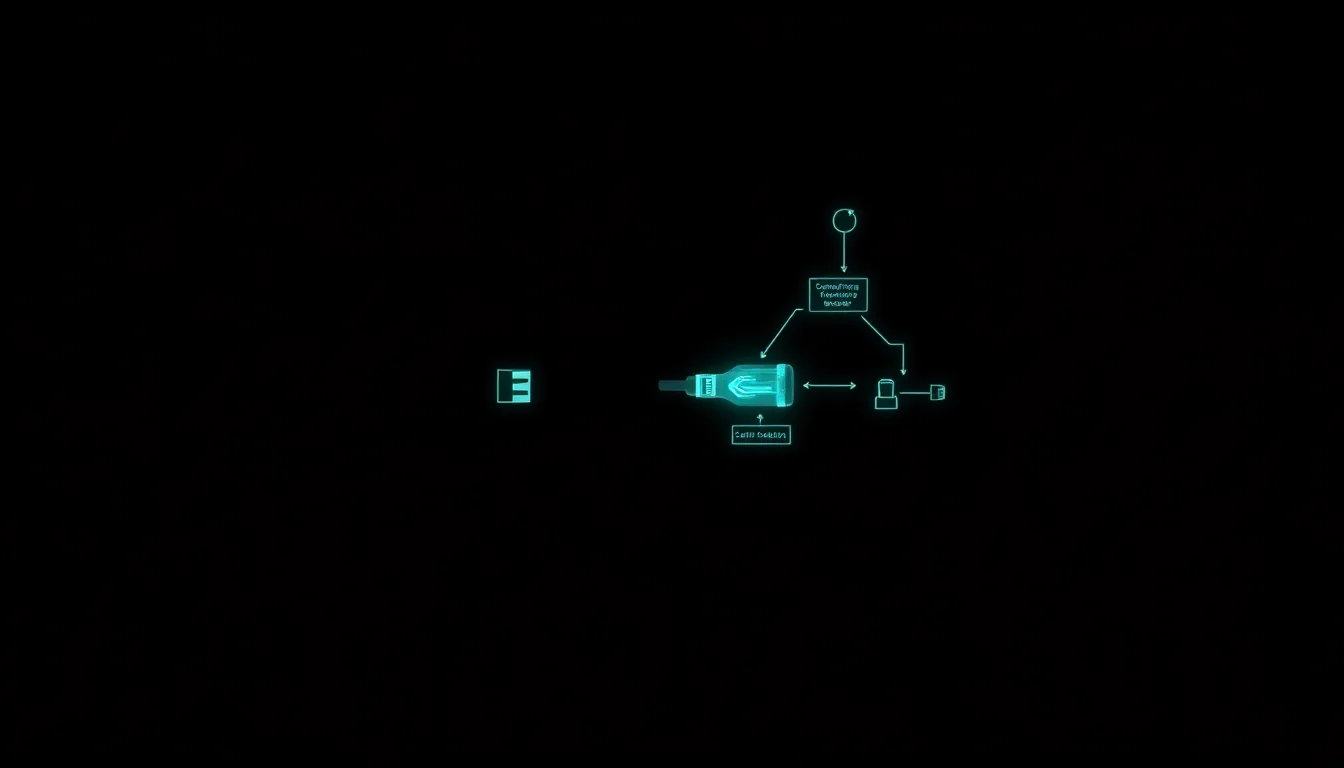
How the Imaging Chain Works (and Where It Breaks)
Every digital dental imaging system has four components in a chain. When any link breaks, imaging stops:
- The sensor or phosphor plate — The physical device that captures the X-ray image. Connected to the workstation via USB (wired sensors) or a proprietary wireless receiver.
- The sensor driver — Software installed on the workstation that allows Windows to communicate with the sensor hardware. Each manufacturer (DEXIS, Carestream, Schick, XDR) has its own driver.
- The imaging software / bridge — The application that receives the image from the sensor, displays it, and stores it. This might be standalone (DEXIS Imaging, Carestream Dental Imaging) or integrated into the practice management software via a "bridge" connection.
- The practice management integration — The link between imaging software and Open Dental, Dentrix, or Eaglesoft. When you click "acquire X-ray" in the patient chart, this integration tells the imaging software to start capturing.
When your staff reports "the sensor isn't working," the failure could be at any of these four points. A systematic diagnostic approach — instead of guessing — resolves most issues in under 10 minutes.
"Sensor Not Detected" — The Diagnostic Flowchart
This is the most common imaging complaint. The bridge software reports that no sensor is connected. Here's how to diagnose it:
Step 1: Check the physical USB connection
Unplug the sensor USB cable from the workstation and plug it back in. Wait 10 seconds. Check whether Windows plays the USB connection sound. If it doesn't, try a different USB port — preferably one directly on the computer, not on a hub, dock, or monitor.
Never use USB hubs for dental sensors. Hubs introduce latency and power delivery issues that cause intermittent sensor disconnections. Every dental sensor manufacturer recommends direct USB connection to the computer. If your operatory workstation doesn't have enough USB ports, add a dedicated USB PCIe card — don't use a hub.
Step 2: Check Windows Device Manager
Open Device Manager (right-click Start → Device Manager). Look for the sensor under "Imaging Devices" or "Universal Serial Bus controllers." If you see a yellow triangle on any device, the driver has a problem. If the sensor doesn't appear at all, Windows isn't detecting the hardware — the issue is physical (cable, port, or sensor itself).
For specific manufacturers, look for these device names:
- DEXIS — "DEXIS Platinum" or "DEXIS Titanium" under Imaging Devices
- Carestream — "CS Sensor" or "RVG" under Imaging Devices
- Schick — "Schick Sensor" under Imaging Devices or USB controllers
- XDR Radiology — "XDR Sensor" under Imaging Devices
Step 3: Restart the imaging bridge software
Close the imaging application completely (check the system tray for background processes). Relaunch it. Many sensor detection issues resolve with a bridge software restart because the software lost its connection to the driver and doesn't attempt to reconnect until restarted.
Step 4: Reinstall the sensor driver
If Device Manager shows the sensor with an error, or if the bridge software still can't find it after a restart, reinstall the sensor driver. Download the latest driver from the manufacturer's support site — don't use the driver from the CD that came with the sensor. Sensor drivers are updated regularly to fix compatibility issues with Windows updates.
USB VID/PID: The Identifier Your IT Team Should Know
Every USB device has a Vendor ID (VID) and Product ID (PID) that uniquely identifies it. When your IT team needs to diagnose whether Windows is detecting the sensor hardware (regardless of driver status), they can check the USB VID/PID in Device Manager.
Here are the common dental sensor identifiers:
- DEXIS sensors — VID: 0x1608 (various PIDs per model)
- Carestream sensors — VID: 0x0E6A
- Schick sensors — VID: 0x0DB7
- XDR sensors — VID varies by generation
If the VID/PID appears in Device Manager but the imaging software can't find the sensor, the problem is in the driver or software layer — not the hardware. If the VID/PID doesn't appear at all, the problem is physical: cable, USB port, or the sensor itself.
CyberCore's agent monitors USB device connections on every workstation and maintains a database of known dental sensor VID/PIDs. When a sensor that was previously connected disappears, the agent detects it immediately — often before the clinical team notices.
Bridge and Integration Failures
Sometimes the sensor is detected, the imaging software can capture images, but the bridge between the imaging software and the practice management system is broken. Clicking "acquire X-ray" in Dentrix or Open Dental does nothing.
Common bridge failure causes:
- Version mismatch — The practice management software was updated but the imaging bridge wasn't (or vice versa). The bridge calls an API endpoint that no longer exists in the updated software.
- Bridge service not running — Some bridges run as Windows services. If the service stopped (after a Windows update, a crash, or a reboot where the service didn't restart), the integration breaks silently.
- Path configuration changed — Bridges store the path to the imaging software executable. If the imaging software was reinstalled to a different directory, the bridge can't find it.
- Port conflict — Some bridges communicate over TCP ports. If another application claims the same port, the bridge can't start its listener.
Preventing Imaging Failures Before They Disrupt Patients
Most imaging failures are preventable with proactive monitoring and maintenance:
- Update sensor drivers on a schedule — Don't wait for a failure. Check the manufacturer's support site quarterly for driver updates. Test on one workstation before rolling out to all operatories.
- Update imaging bridges when you update practice management software — Always check bridge compatibility before and after a Dentrix or Open Dental update. Bridge vendors typically release compatibility updates within a week of a major PMS update.
- Standardize USB port assignments — Always connect the sensor to the same USB port on each workstation. Changing ports can trigger a driver re-detection cycle that wastes clinical time.
- Monitor sensor health continuously — CyberCore detects sensor connection status across all operatories in real time. When a sensor disconnects, an alert fires immediately — not when the hygienist discovers it with a patient in the chair.
Imaging equipment failures are stressful because they directly stop patient care. But the diagnostic process is systematic: check the hardware, check the driver, check the software, check the integration. Run through this flowchart before calling your imaging vendor, and you'll resolve most issues in minutes — not the hours it takes when you're waiting on hold.